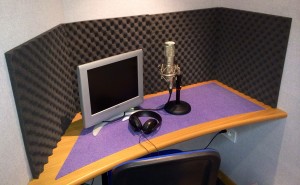
Yet again acoustics come to the forefront of DirectVoices after the success of the our latest post Dreaded Ambient Noise. Acoustics it’s indeed one of the most important features of any home studio and sadly one of the most neglected ones. Understanding how the sound behaves in the enclosed space of your home studio is already a big step, because not only you will realize that reverb or echo can ruin your recording, but you will discover that an acoustically treated home studio are a real bonus for your VO services, because your voice will have a crisp and warm sound. Remember that the right mic or preamp will not fix wrong room acoustics. A there’s no quick fix either to echos and reverb using sophisticated plugins in your audio post-prod software.
So we wanted to have the opinion of a true expert Roy Yokelson from Antland Productions. Producer/Director, Sound Designer, Voice-Over Coach, Sound Archivist, “Uncle Roy” has been serving the voice-over community for over three decades as director/producer/engineer of countless commercial, documentary, and corporate recording sessions at numerous high-profile New York City studios.

THE IMPORTANCE OF ACOUSTICS
by Uncle Roy
Aside from having a great voice and a quality microphone to record it with, there are few things as important as having the appropriate room and acoustic set-up to perform quality voice overs. Without it your sound recordings will not have the hallmark of quality that you are hoping for and if you are pitching for work, your recordings wont represent you in the best light.
Getting the acoustics right is one of the key things that newbies to the voice over industry sometimes struggle with. After all, unless you can afford to use a professional recording studio every day, you are restricted to whatever is available to you, which is usually a room in your house.
However, it is absolutely possible to produce broadcast quality recordings in your home. First and foremost you are going to need a quiet place to record in, so choose the quietest room in the house. This might be your basement, or choosing a room closer to the center of the house might be a good choice, away from windows – perhaps a walk-in closet. Basically the further you can distance yourself from roads and other outside noise the better.
Whatever space you choose it’s going to need to be big enough to accommodate a microphone on a stand, a music stand, possibly a chair or stool, and last but not least, yourself!
Be aware that room acoustics is different than ‘sound proofing – it is near impossible, without building an enclosed voice booth, to stop outside noise from coming into your room. Soft furnishings, drapes, carpets etc. will help to absorb.
When it comes to the acoustic treatment of your room it may be advisable to invest in some acoustic panels, like Clearsonic ‘Sorber’ panels. There are plenty of varieties on the market and you can purchase them at different thicknesses. As a basic rule of thumb this is what you are probably going to need:
– To deal with bass or low frequencies you are going to need foam panels which are 6 inches or over in thickness.
– To handle the mid range and higher frequencies you are going to need foam panels which are about 2 to 3 inches thick.
– To deal with reverberations in the room you are going to need foam which has triangle or pyramid shapes embedded to help with the sound absorption.

There is plenty of advice on the internet about the acoustic treatment for your room, so do your research before you plaster your room with acoustic wall panels! Going overboard with acoustic panels will deaden the room too much and make for a very unnatural sound so there is definitely a balance to be struck. Speak to a sound engineer for more advice about acoustic treatment; they will put you on the right path.
The world of sound and acoustics can be a complex one but with a little planning, the right materials, and getting advice from the professionals, you can create a recording space in your home that will serve you well for years to come.
What do you think? How did you acoustically treat your recording space? It would be good to hear from you.

Great tips there from the famous ‘Uncle’ Roy. Here, in rural Devon, England, outside noise is only sporadic – but heavy rain on the flat roof will stop a session: so I have 36 thick rubber patio tiles ready to go up on top, outside. Interior treated with thick upholstery foam, quadruple curtains, quadruple glazing.
Once-prominent hum from boiler almost eliminated by embedding its pipes in concrete, and reducing the mains power to the thing by 25 percent (get advice before trying that!). Fixing things at source is always a better solution than notching or gating.
Apart from moving house in the first place, away from town noise, nothing has cost much. But with each improvement in isolation, of course, other things become apparent. Now, with the gain on max, I know when my wife is on the phone in the room below. That calls for an additional layer of boards and carpet. Easier than the obvious alternative….
Thick patio tiles on top are a good solution to avoid the rain dropping noise. Great idea ! To have a home-studio completely soundproof is virtually impossible, so the best thing to do in post-production is using a low frequ. filter, the one that you find in the EQ plugin. Those frequencies that carry the noise can be removed, without altering the bass sounds from your voice.
Hi guys!
Very nice post.
This is my experience: im my studio I did a lot of jobs to avoid reflections and any extra noise. Reflections are bit easy to eliminate if you have a corner for the voice, but to keep out the world I work very hard: double wall, lead and rubber, wood, self building door as the drummer have at home and, I can be in peace from many sounds BUT… the renforced concrete of the building transport some noise by the floor and the roof, also, the ventilation pipes leave a light noise but permit to have fresh air in studio.
To eliminate the sounds transported by steel and concrete you should to build a floating cabin…
Anyhow, was very little noise in background, you could feel just in headphone and a tiny noise gate software was enough, but…
some month ago… comes workers to replace the roof of the building where is my studio and…
Oh goodness!! Hammers, Trucks, people with drill…
there was ever some noises!
I could not record only when them go at home!!
So I re-discover the Hardware Noise Gate.
Noise gate before to go in the sound card, not too much, just a bit.
And, if you know how to, you can use for long reading to de breathe in natural way (long release, hold time…).
A good noise gate – hardware noise gate – in the boot is not the same of a noise gate in post production, is better.
You know how it works in real time. You have no more noise in back ground.
Think about.
Cheers
Hi Uncle Roy:
Great advice from a true pro (and super nice guy to boot). Roy, thank you for all your help in making my home studio broadcast quality.
I just completed an audiobook through acx.com in my home studio. I narrated it, edited and mastered it all in my home studio (and Roy helped with mastering) so it most definitely is possible to do your VO work from home. It’s not as difficult as it sounds–do your research–and good luck to you.
Best,
Marie Hoffman